I always wanted to have personal home server which can host a web service with PHP, PERL, Python and MySQL, FTP or WebDAV services, Subversion service or stream multimedia.
At the same time I didn’t want to have huge installation with GUI which will become useless when everything is correctly setup and also consumes some disk space but I wanted to have some easy access to the machine so I can configure it or do some maintenance if needed.
Here is the step-by step description of how I setup my personal home server.
Host machine
I didn’t want to have the server as main OS running on separate machine because I have quite cheap but powerful and power efficient machine called ZOTAC ZBOX ID41 where I already had Windows XP preinstalled. To host another system in XP I used virtualization software called VirtualBox to create new virtual machine where Ubuntu server will be installed.
After VirtualBox is installed I created new machine with the following main parameters:
OS type: Ubuntu
Base memory: 512MB
Acceleration: PAE/NX
HDD: 20GB
Other settings are left default.
Initial installation
The latest ISO release of Ubuntu server can be downloaded from their official pages www.ubuntu.com/download/server
Now just mount the ISO to the IDE controller the new virtual machine and start the machine. Go through the installation process and when asked, enter the required data (name, login credentials, time zone, …)
When asked for services to be installed I checked
- OpenSSH
- Mail server
- DNS server
- LAMP
- SAMBA file sharing
When installation is done the machine reboots and the ISO image should be automatically disconnected. Now you can safely turn the virtual machine off.
Later, when you configure at least SSH so you can connect remotely you might want to have the virtual machine running without the terminal window displayed all the time in host system. To solve this you can use very usefull tool called VBoxHeadlessTray which will run your machine in system tray.
Web GUI installation
First of all upgrade your fresh new system to have all packages updated. To do this you can log in either as root (then you will use the following commands without “sudo”) or better with user you created during installation (you will use the commands with “sudo”)
Update all packages:
sudo apt-get upgrade all
One of the best web GUI maintenance software (which will be used on our site) is Webmin – on their donwload page select the correct package for your Linux distribution and then type in terminal:
sudo wget http://prdownloads.sourceforge.net/webadmin/webmin_1.590_all.deb
sudo dpkg -i webmin_1.590_all.deb
Most probably some dependent packages will be missing so we have to install them (modify the list of packages to be installed according to error messages you will get):
sudo apt-get install libnet-ssleay-perl libauthen-pam-perl libio-pty-perl libapt-pkg-perl apt-show-versions
… or easier
sudo apt-get -f install
Now also webmin should be automatically installed and configured and you should receive a message like (“homeserver” in the URL is the name of my server):
** initializing cache. This may take a while **
Setting up webmin (1.590) ...
Webmin install complete. You can now login to https://homeserver:1000/
as root with your root password, or as any user who can use sudo
to run commands as root.
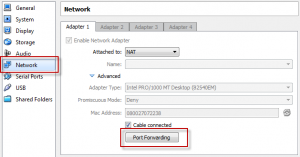
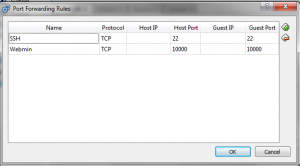
To be able to access the virtual machine from the outside world we have to configure the virtual machine settings to forward required ports of host OS to guest OS. This is valid for Network being attached as NAT.
If you used bridged connection the machine is exposed to the outside world.
In case you are sitting behind router, you’ll need to forward ports you’ll use to this machine (10000: webmin, 20 and 21: FTP, 22: SSH, 80: HTTP, 25: SMTP, …)
Now we have the virtual machine well prepared to be run in headless mode in taskbar so we can:
- Shutdown the virtual machine
- Start the VBoxHeadlessTray program
- From the list of available virtual machines select our new Ubuntu server
- Check “Power on machine” and click OK
- You should now see the following VBoxHeadlessTray icon in taskbar

How to setup individual services will be explained in the next post.


